How to Solve a Rubik's Cube in 30 Seconds Without Memorizing: Even a Child Can Understand
In my previous post, How to Solve a Rubik’s Cube Without Memorizing Algorithms, you learned to solve the cube with commutator logic, without memorizing a single algorithm. That article got a lot of warm feedback.
If you followed along step by step, you should already be able to stumble your way through a full solve. With a few hundred practice solves, getting under 1 minute is quite easy. But what if you want to get even faster?
Search for “speedcubing,” and every tutorial will tell you the same thing: to get under 30 seconds, you need to memorize over a hundred CFOP algorithms first.
This article aims to show you that you can achieve sub-30 second solves without memorizing any algorithms at all.
From my very first complete solve on May 7, 2026, to achieving an Ao100 under 30 seconds on August 4, it took me 89 days. Throughout this period, I didn’t memorize a single CFOP algorithm; I simply enjoyed cubing in my spare time. Here’s the timed data from my 4441 recorded solves.
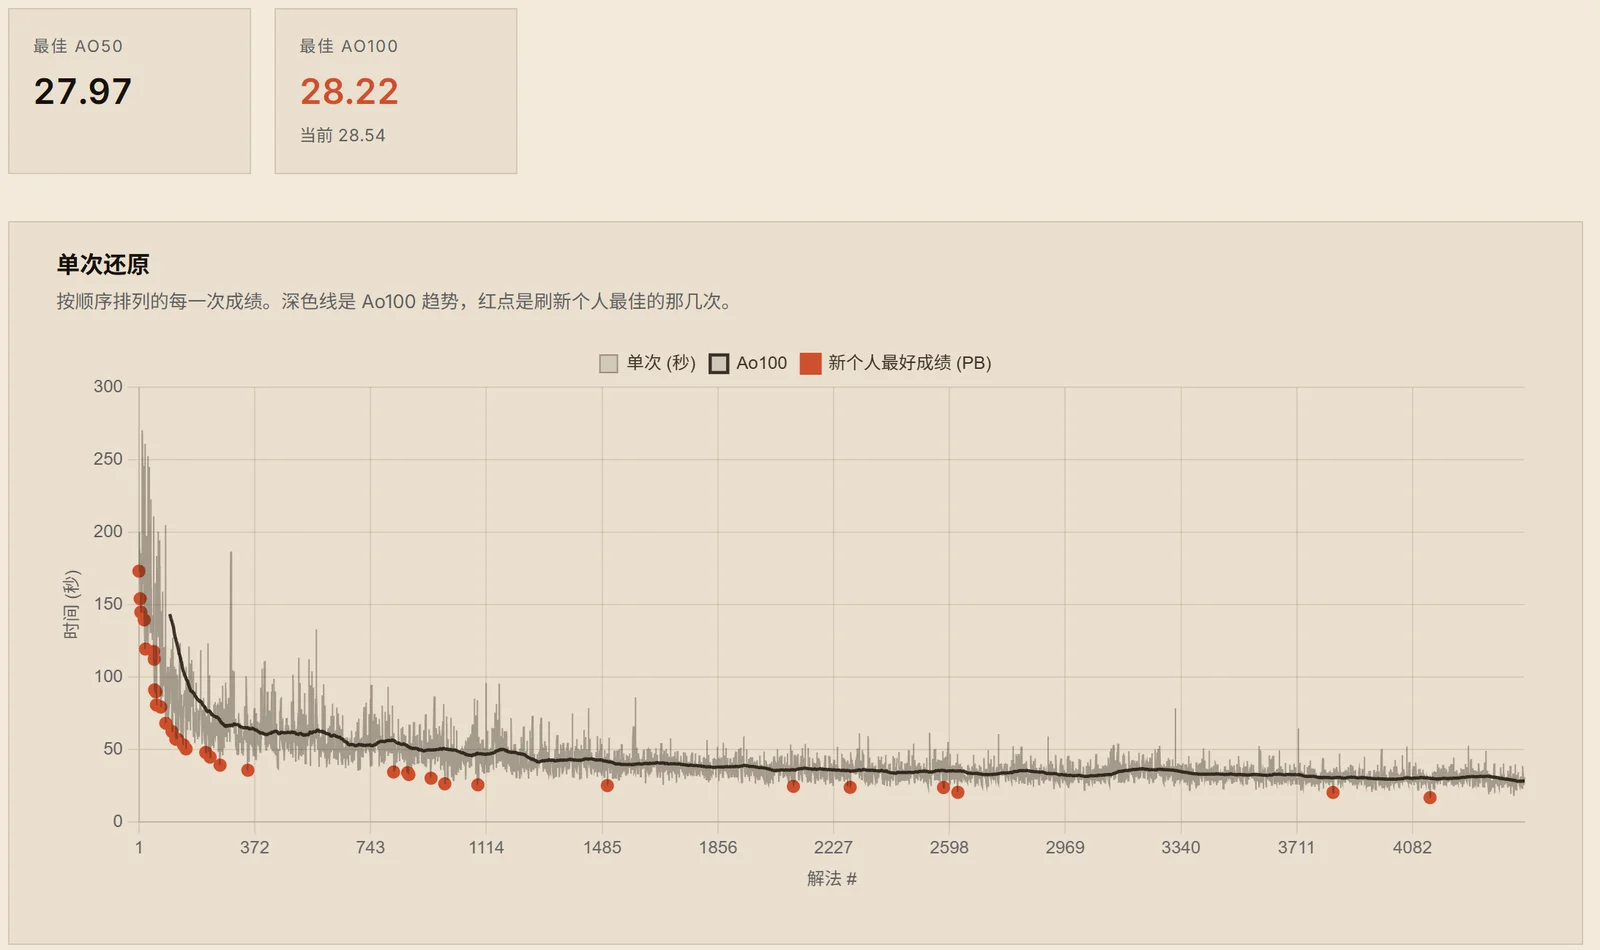
Figure: Performance curve for 4441 solves. The gray line represents individual solve times, the dark line shows the Ao100 trend, and red dots mark personal bests. My best Ao100 was 28.22 seconds.
With conscious, deliberate practice and consistent frequency, anyone can go from zero experience to sub-30 in just a few months.
What does “under 30 seconds” actually mean? At the first Rubik’s Cube World Championship in 1982, the champion’s time was 22.95 seconds, which the WCA later recognized as the first official world record. The 10th place finisher, at 29.11 seconds, was none other than Jessica Fridrich herself, the inventor of CFOP, whom we’ll discuss in the next section. In other words, an amateur’s sub-30 time today, achieved with a few months of practice, would have placed them in the world’s top ten in 1982.
Next, I’ll share my step-by-step journey and the complete practice method I used.
Why the Speedcubing World Relies on Algorithms
First, let’s clarify something: Why are “speed” and “memorizing algorithms” so intertwined in people’s minds?
In the early 1980s, Czech-born professor Jessica Fridrich (who later researched digital forensics at Binghamton University in the US) organized a layer-by-layer solving method, which later became known as CFOP (Cross, F2L, OLL, PLL). The core idea of this method is to exhaustively list all possible top-layer situations and assign an optimal algorithm to each. You recognize the pattern, execute the algorithm, and no thinking is required.
This method is incredibly fast. Almost all world records are achieved using CFOP. Consequently, every tutorial teaches it, every video discusses it, equating “learning speedcubing” with “learning CFOP,” and learning CFOP with memorizing 119 algorithms.
However, it’s crucial to note that “memorizing algorithms” is a characteristic of the CFOP method, not of speed itself. CFOP requires memorization because it takes the path of exhaustive enumeration. Enumeration demands memory—that’s the price it pays.
Are there methods that don’t rely on exhaustive enumeration? Yes, there are.
The Algorithm-Free Method: Roux
In 2003, Frenchman Gilles Roux published a completely different approach. Instead of solving the cube layer by layer, you start by building two 1×2×3 blocks on the left and right. Then you solve the four corners of the top layer, leaving only six edges, which are finished using nothing but M (middle slice) and U (top layer) moves.
We already used this framework to solve the cube once in the previous post. Let’s revisit its four steps, this time focusing on “what needs to be memorized at each stage”:
| Step | Content | Algorithms to Memorize |
|---|---|---|
| 1. Left Block | Build a 1×2×3 block | 0, purely observational |
| 2. Right Block | Symmetrically build the second | 0, purely observational |
| 3. CMLL | Position and orient the four top-layer corners | 9, all derivable from 3-cycles |
| 4. LSE | Last Six Edges | 0, only using U and M layer turns |
Three out of the four steps require no algorithms at all. For CMLL, while there are 42 total cases, you don’t need 42 algorithms. The corner 3-cycle (R U’ L’ U R’ U’ L U) we discussed in the previous post, along with its mirror and a few variations, can cover all situations, albeit a bit slower.
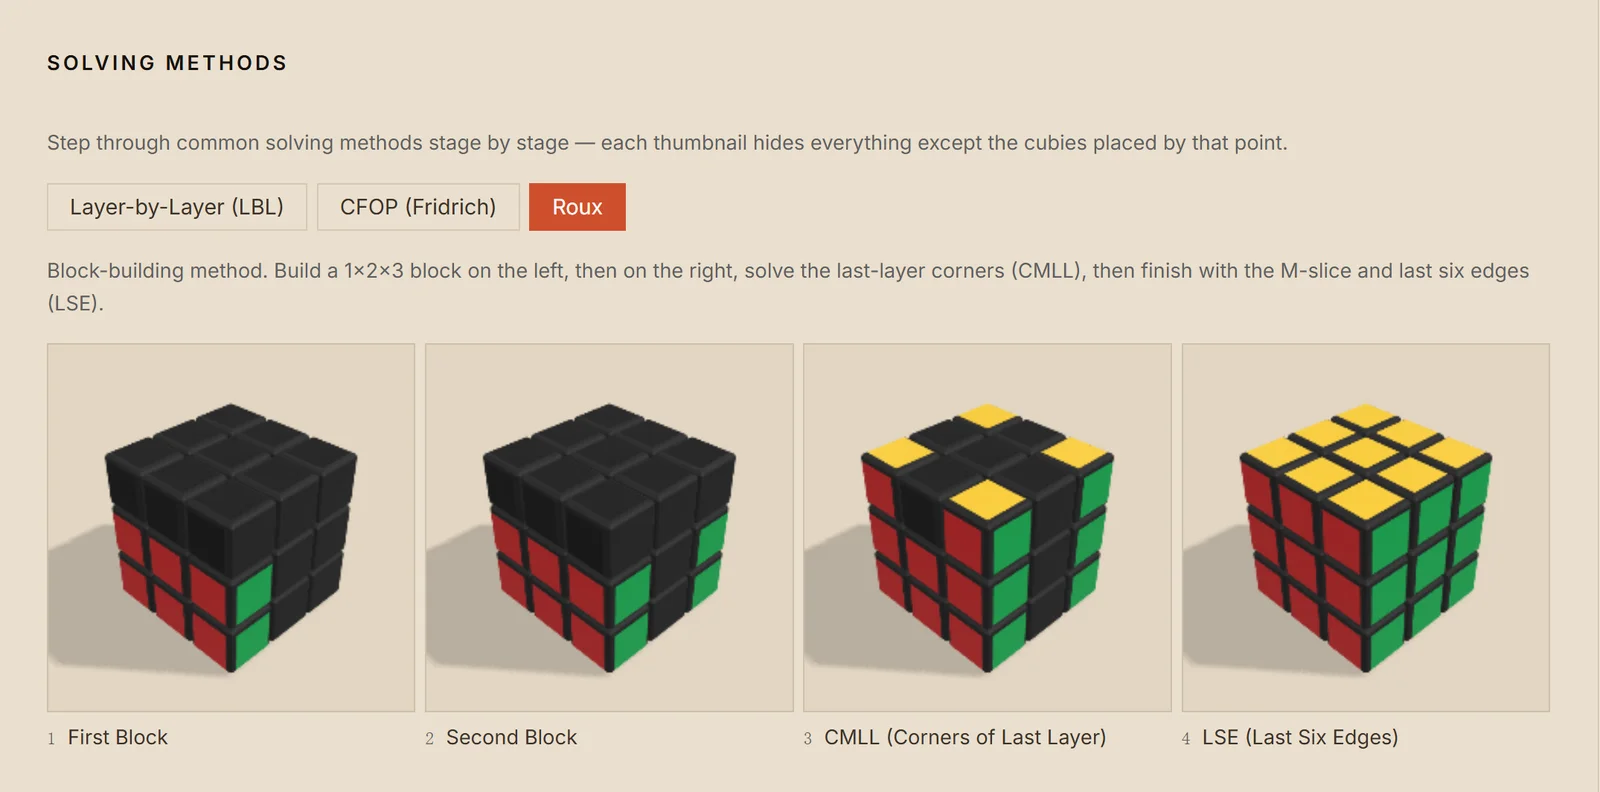
Figure: The four steps of Roux, showing only the pieces solved up to that point: Left Block → Right Block → CMLL (Top Layer Corners) → LSE (Last Six Edges). Screenshot from the ‘Solving Method’ panel of my 3D Rubik’s Cube page.
This is why Roux can be done without memorizing algorithms: it compresses the memorization part into a tiny corner, leaving the rest to observation, understanding, and practice.
From 165 Seconds to 28 Seconds: Four Stages
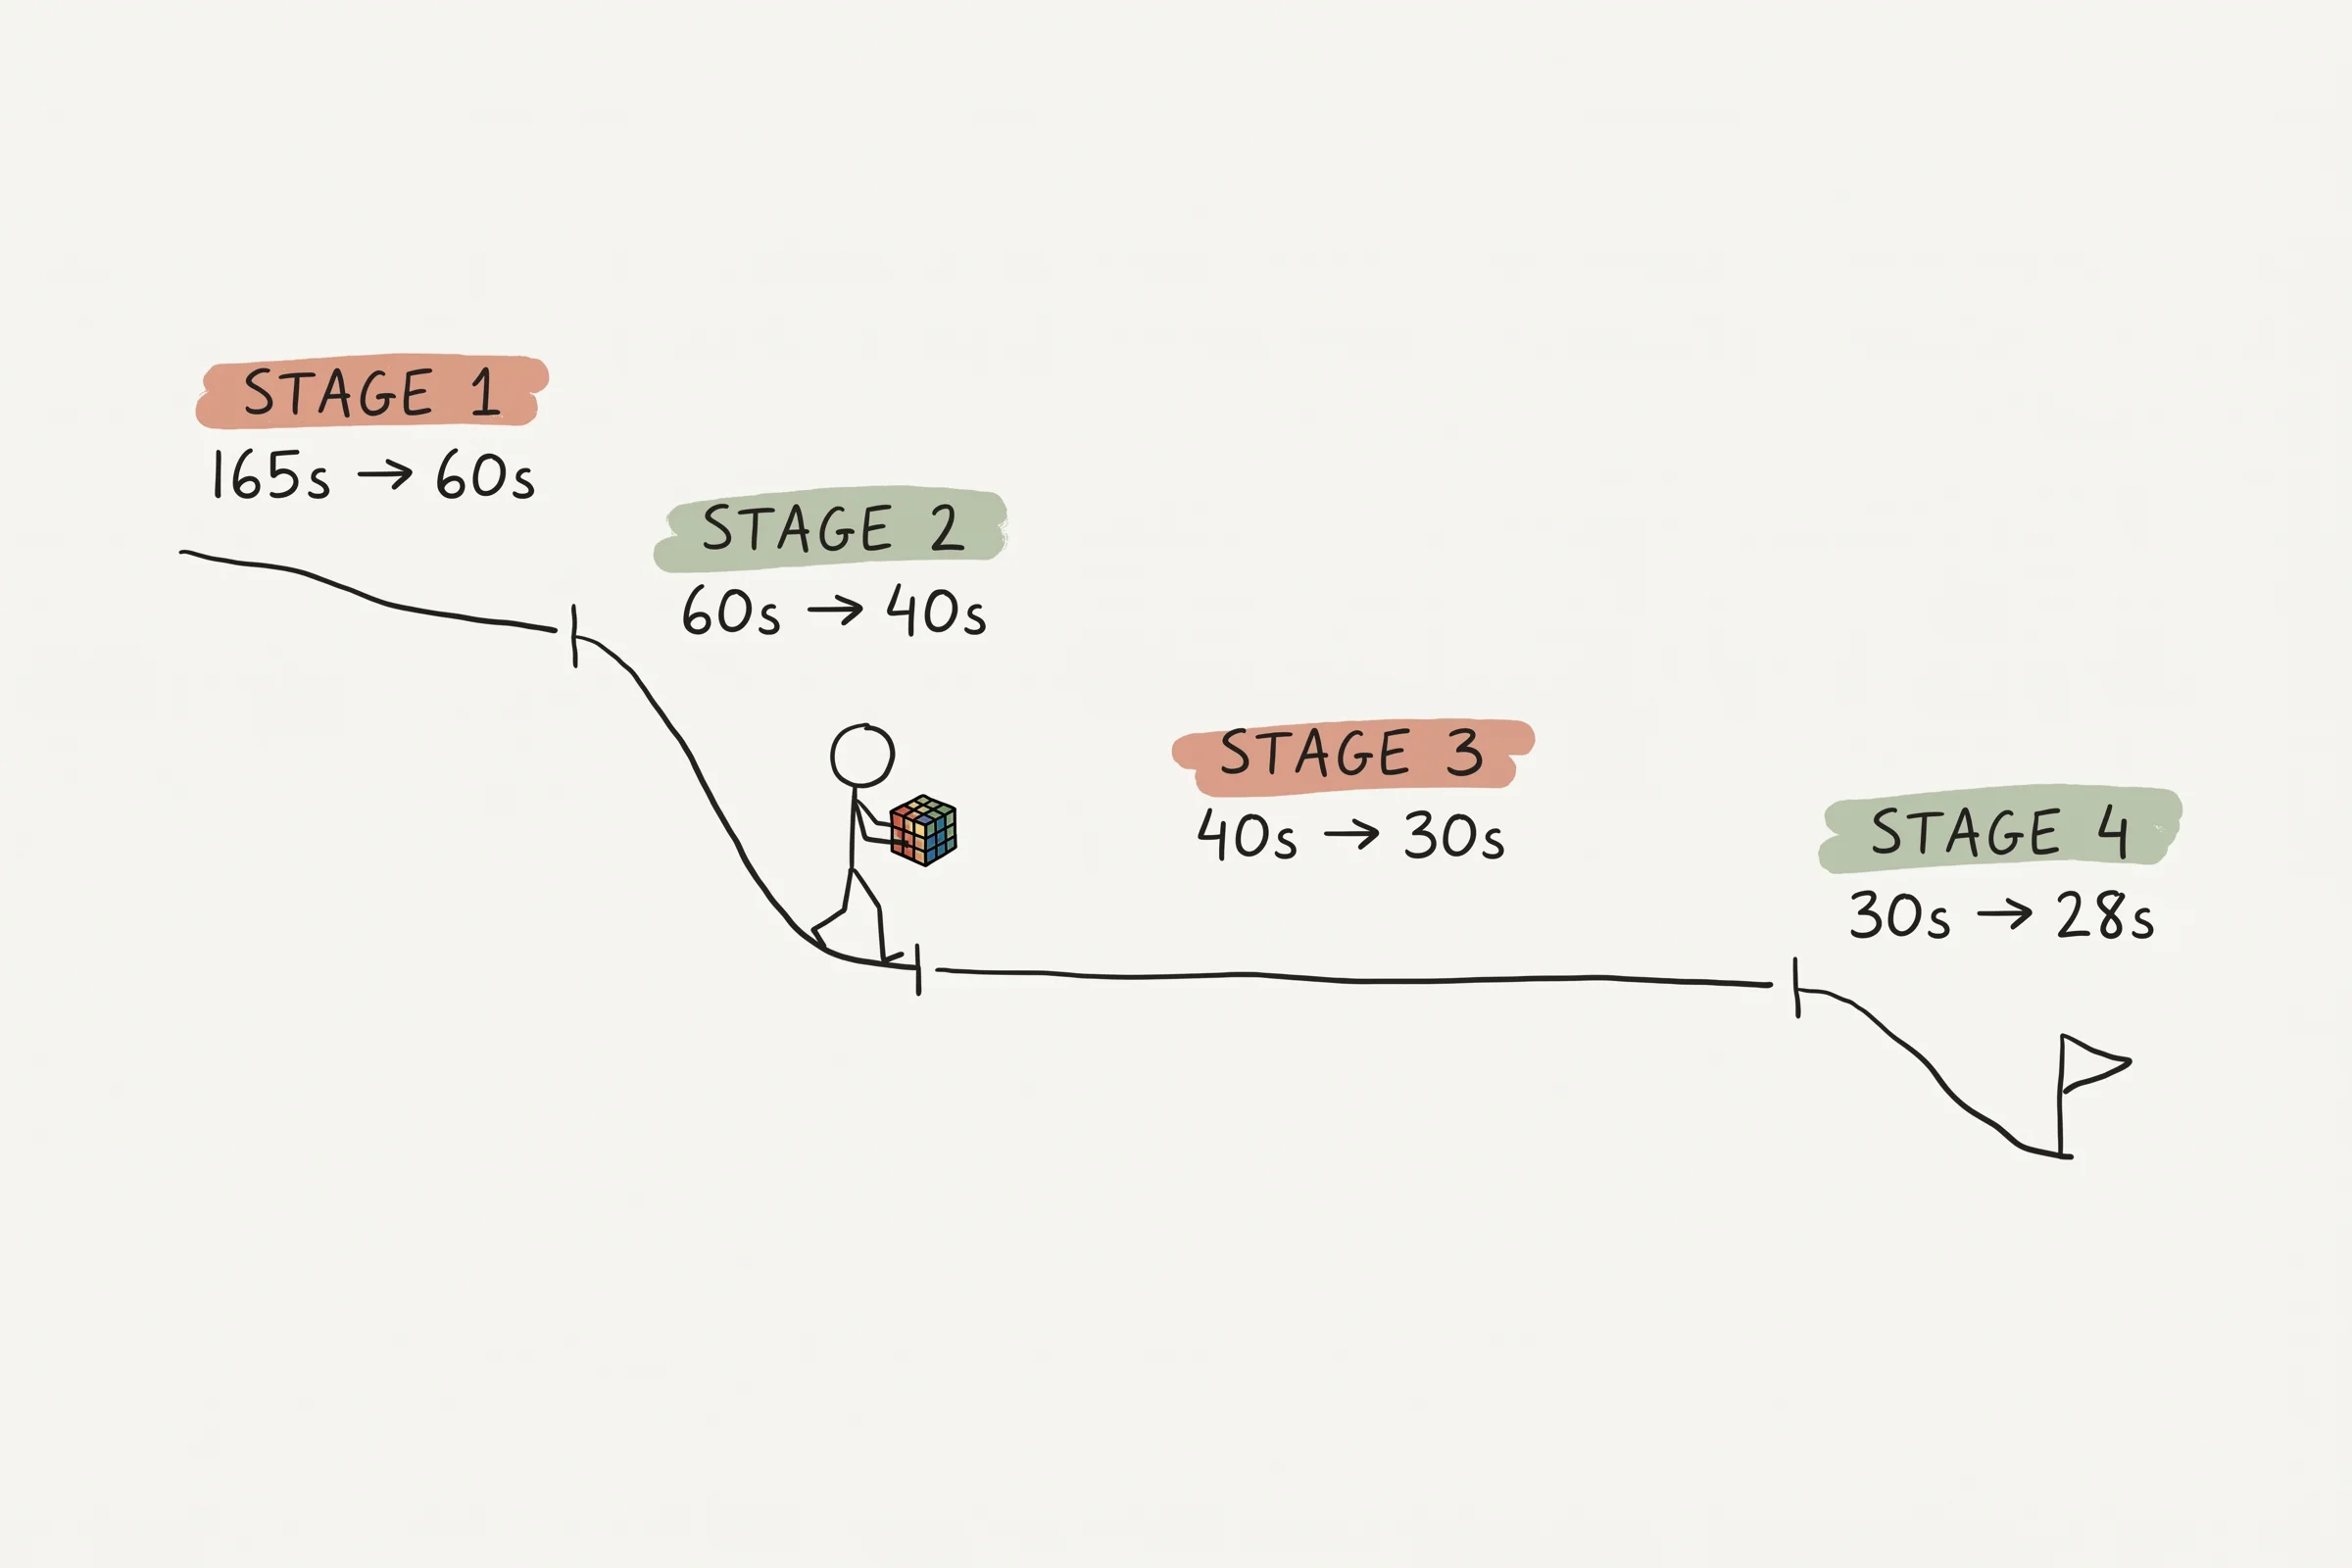
Figure: Time span of the four stages. Stage one: 3 weeks, Stage two: 11 days, Stage three: 2 months, Stage four: ongoing.
Stage One: 165 Seconds → 60 Seconds (Weeks 1–3)
Data: May 7th to May 27th. My average for the first week was 165 seconds, dropping to 68 seconds by the third week. This is the transition from complete novice to beginner, gradually understanding through repetition what each move really does and which pieces are moving.
Sticking Point: The left block was very unfamiliar; I’d spend a long time searching for each color pair. And after finding a pair, beginners always tend to pause and keep observing.
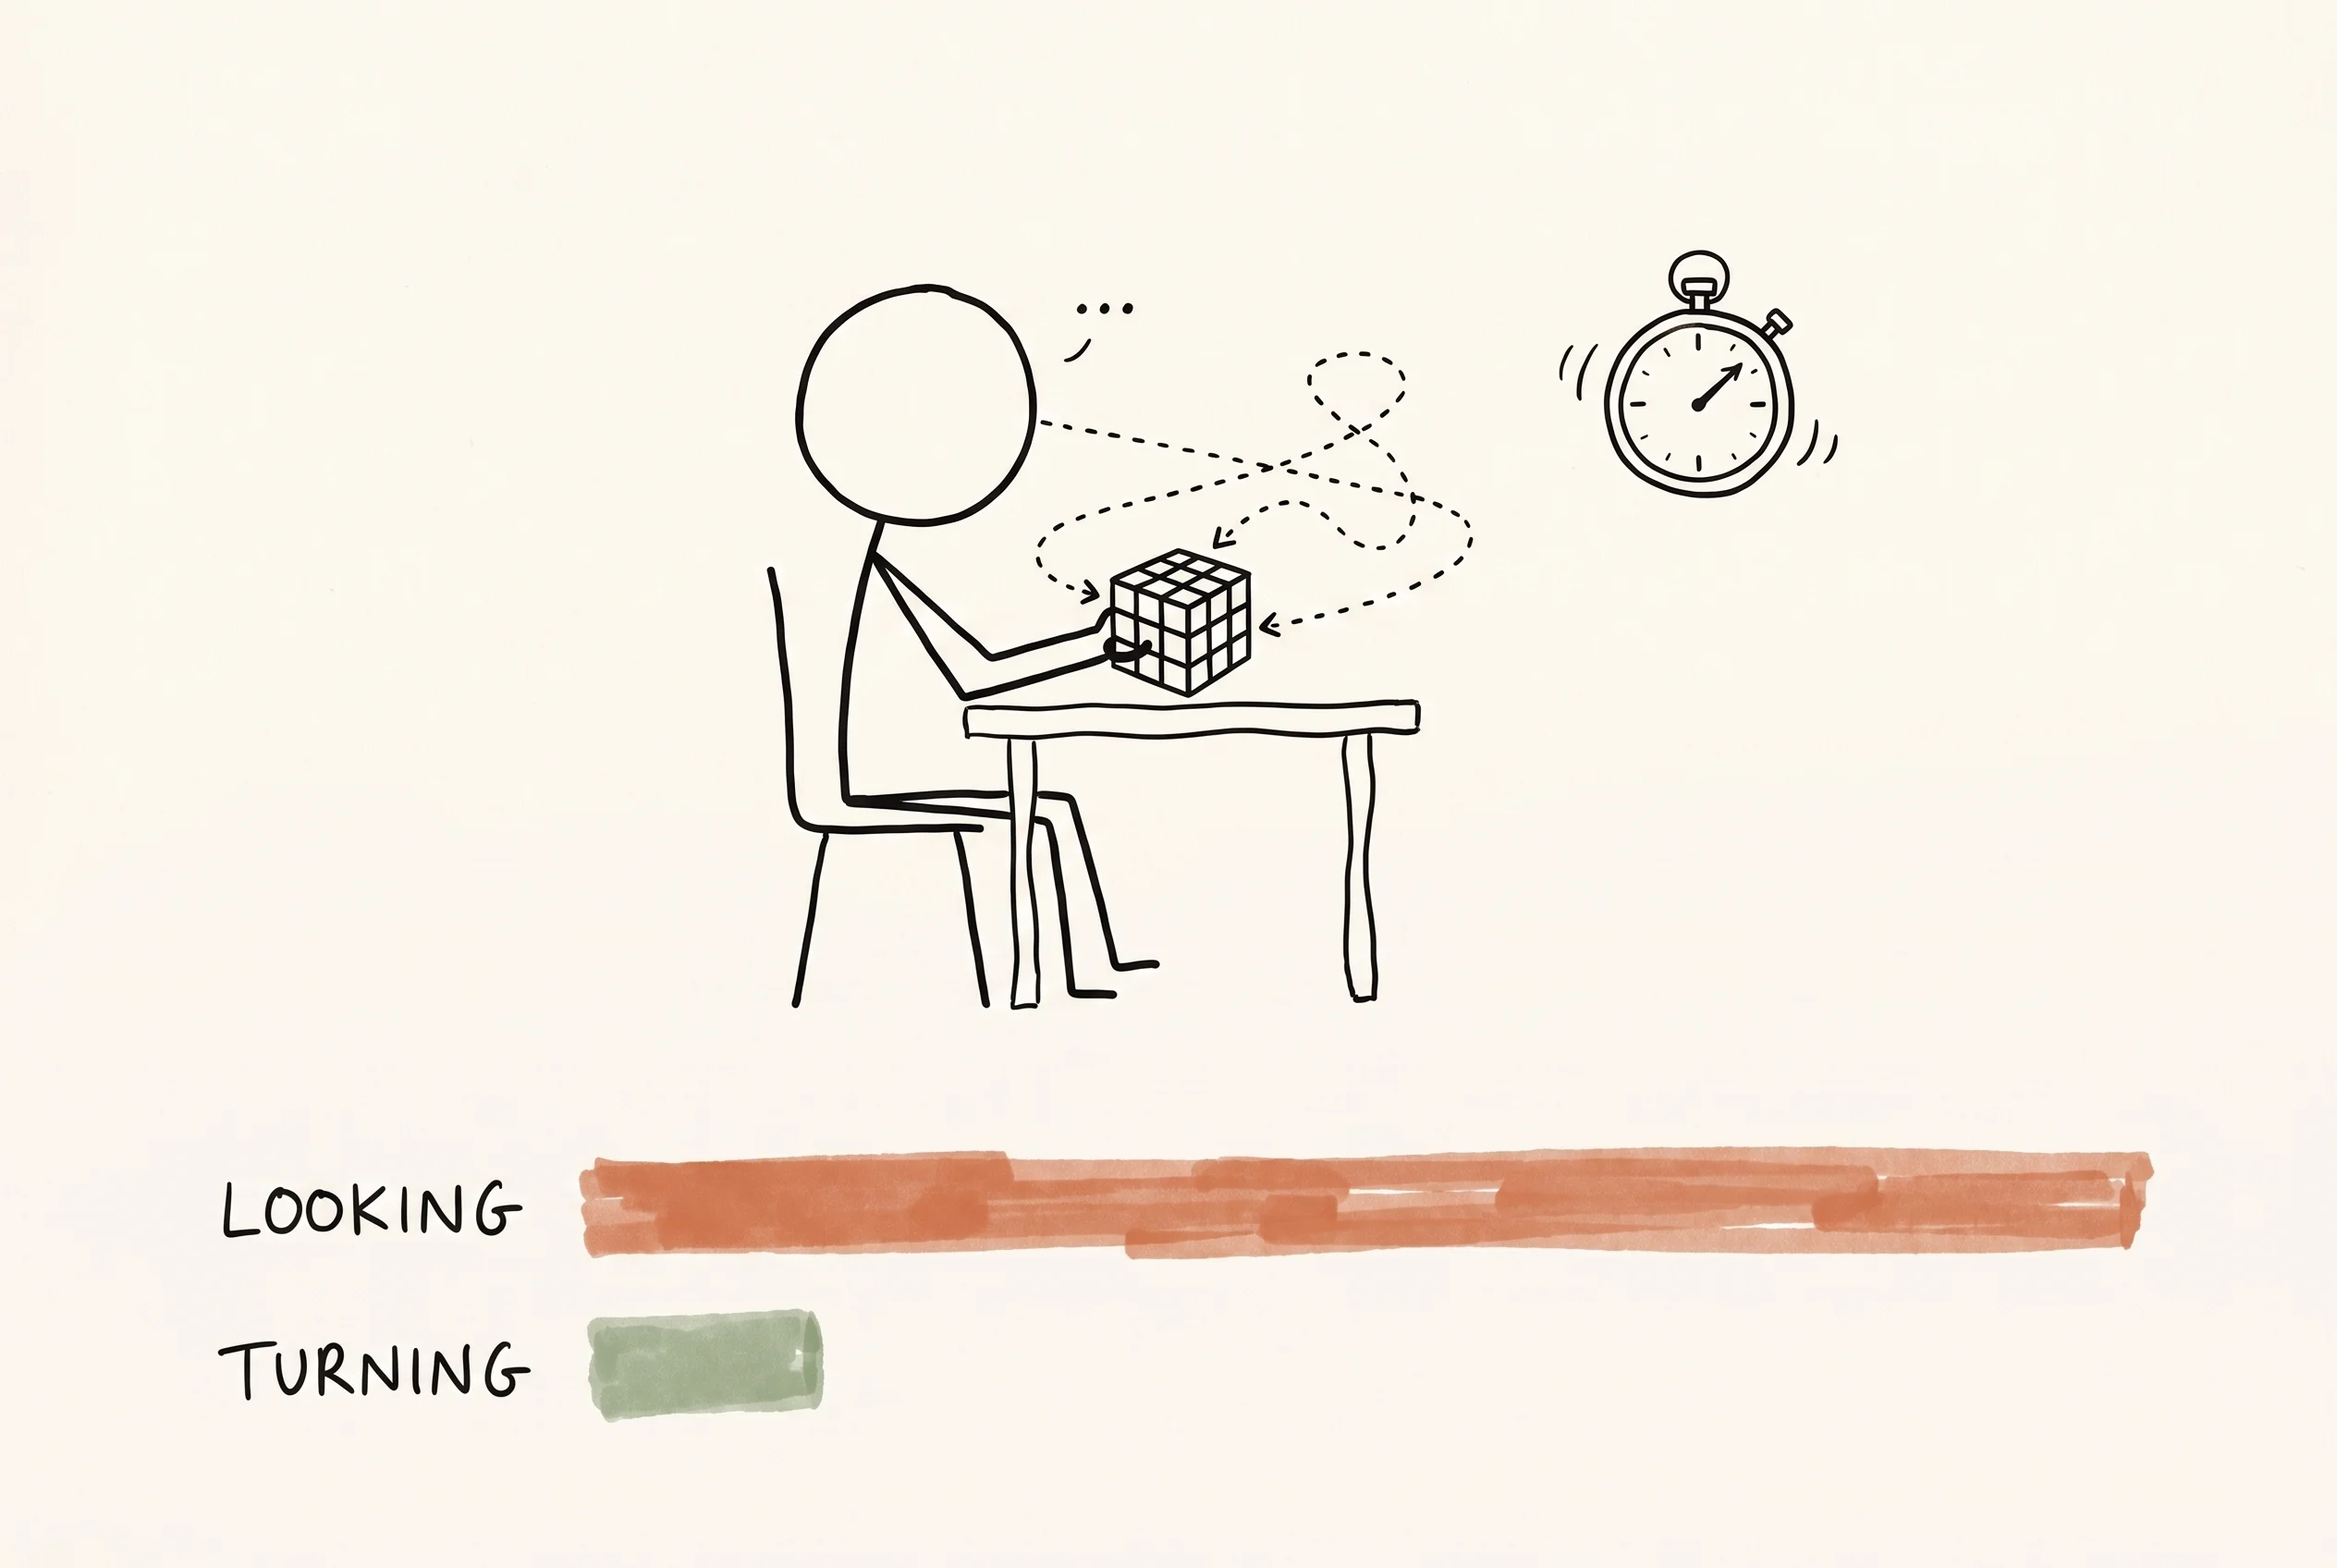
Figure: Where beginners spend their time. Hands are idle, eyes darting back and forth across the cube. ‘Searching’ takes several times longer than ‘turning.’
What to Practice:
The biggest enemy at this stage isn’t slow hands, it’s slow eyes. You spend far more time ‘searching’ than ‘turning.’ So:
- Maintain a fixed observation position; don’t rotate the cube. As mentioned in the previous post, Roux’s observation angle is fixed. At this stage, you need to develop the muscle memory of ‘not rotating the cube.’ Every time you feel tempted to turn the cube, pause and ask yourself: Can I see the piece I need from this angle?
- Slow turning (untimed). Don’t time yourself, but ensure your movements are continuous and without any pauses. Each move can be very slow, but there should be no hesitation. The key is for your eyes to focus on the next move while your hands are performing the current one—this is the core of slow turning. While it might sound like you’re slowing down, you’re actually training your eyes to recognize the relationship between a piece’s current position and its target position.
- Only practice the first block. Scramble, build the left block, scramble again, build the left block again. Don’t proceed further. The first block is the freest step in Roux and the most effective for training observation skills.
Don’t learn any new algorithms at this stage. Your current bottleneck isn’t algorithms.
Stage Two: 60 Seconds → 40 Seconds (Weeks 4–5)
Data: May 27th to June 7th, 11 days. This was the fastest drop in my entire journey. This stage offers the easiest positive feedback—every bit of learning and move optimization immediately reflects in your times, and the thrill of breaking personal records every single day is hard to match.
Sticking Point: Choppy turning, and the cube kept catching.
What to Practice:
At this stage, you need to optimize the movements for each step, building on your understanding to increase the fluidity of every action.
- The second block. This is harder than the first because you have half the space, and you cannot disrupt the already completed left block. Key moves are R, r (right two layers), M, and U. At this stage, learn to use r and M instead of R to move pieces, ensuring the left block remains undisturbed. Optimizing your move sequence is how you save time. For example, three clockwise turns are equivalent to one counter-clockwise turn.
- Mastering the M-layer. The latter half of Roux relies entirely on M and U moves, and how smoothly you turn the M-layer directly determines your speed floor. Use your ring finger or middle finger to push M, and start practicing rhythms like M’ U M’ U.
- CMLL pattern recognition. In the previous post, we ‘tested’ our way to solving the four corners using 3-cycles. Now, it’s time to ‘see then do’: before turning the top layer, glance at the yellow orientation of the four corners to determine if there are 0, 1, 2, or 4 ‘good’ corners, then directly execute the corresponding moves. Even a small number of algorithms can bring significant efficiency improvements, making this a very worthwhile investment. A large portion of these algorithms doesn’t require rote memorization; you can understand them as you practice.
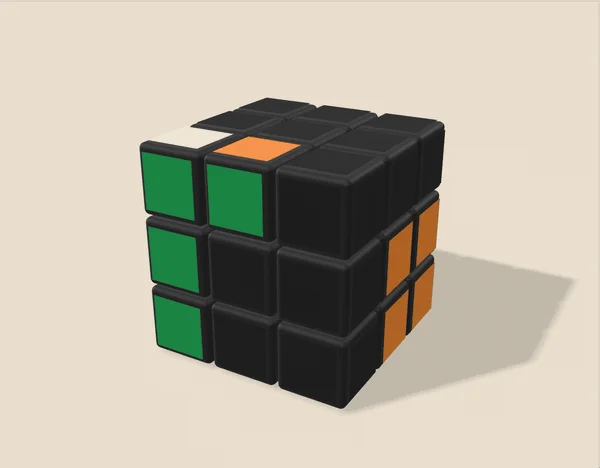
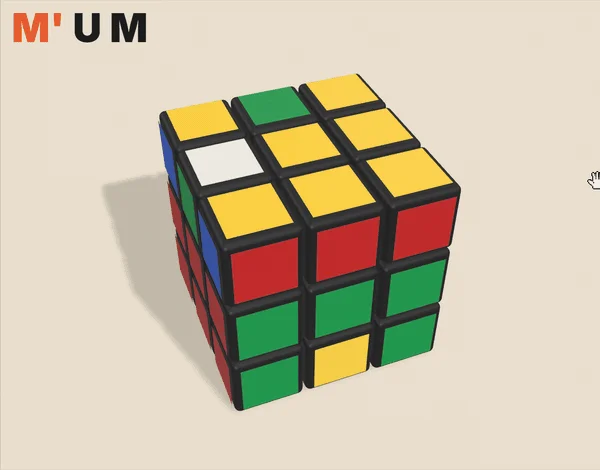
Figure Left: View while building the right block. The left block is complete, and only R, r, M, and U moves are used to insert the corner-edge pairs on the right side, ensuring the left block is never disturbed. Figure Right: M’ U M, one of the most frequently used move sequences in the latter half of Roux. Middle layer up, top layer turn, middle layer back—three moves to swap a pair of edges between the top and middle layers.
You can refer to my beginner-friendly, streamlined Roux Algorithm Library. The CMLL page features a two-step approach: 7 orientation algorithms + 2 permutation algorithms, totaling 9. This is a highly cost-effective way to boost speed and is easy to learn; mastering each set can shave off roughly 1-2 seconds. With a little practice, you’ll quickly become proficient. Some of these were already introduced in the previous article, and you don’t need to memorize all of them to get under 30 seconds.
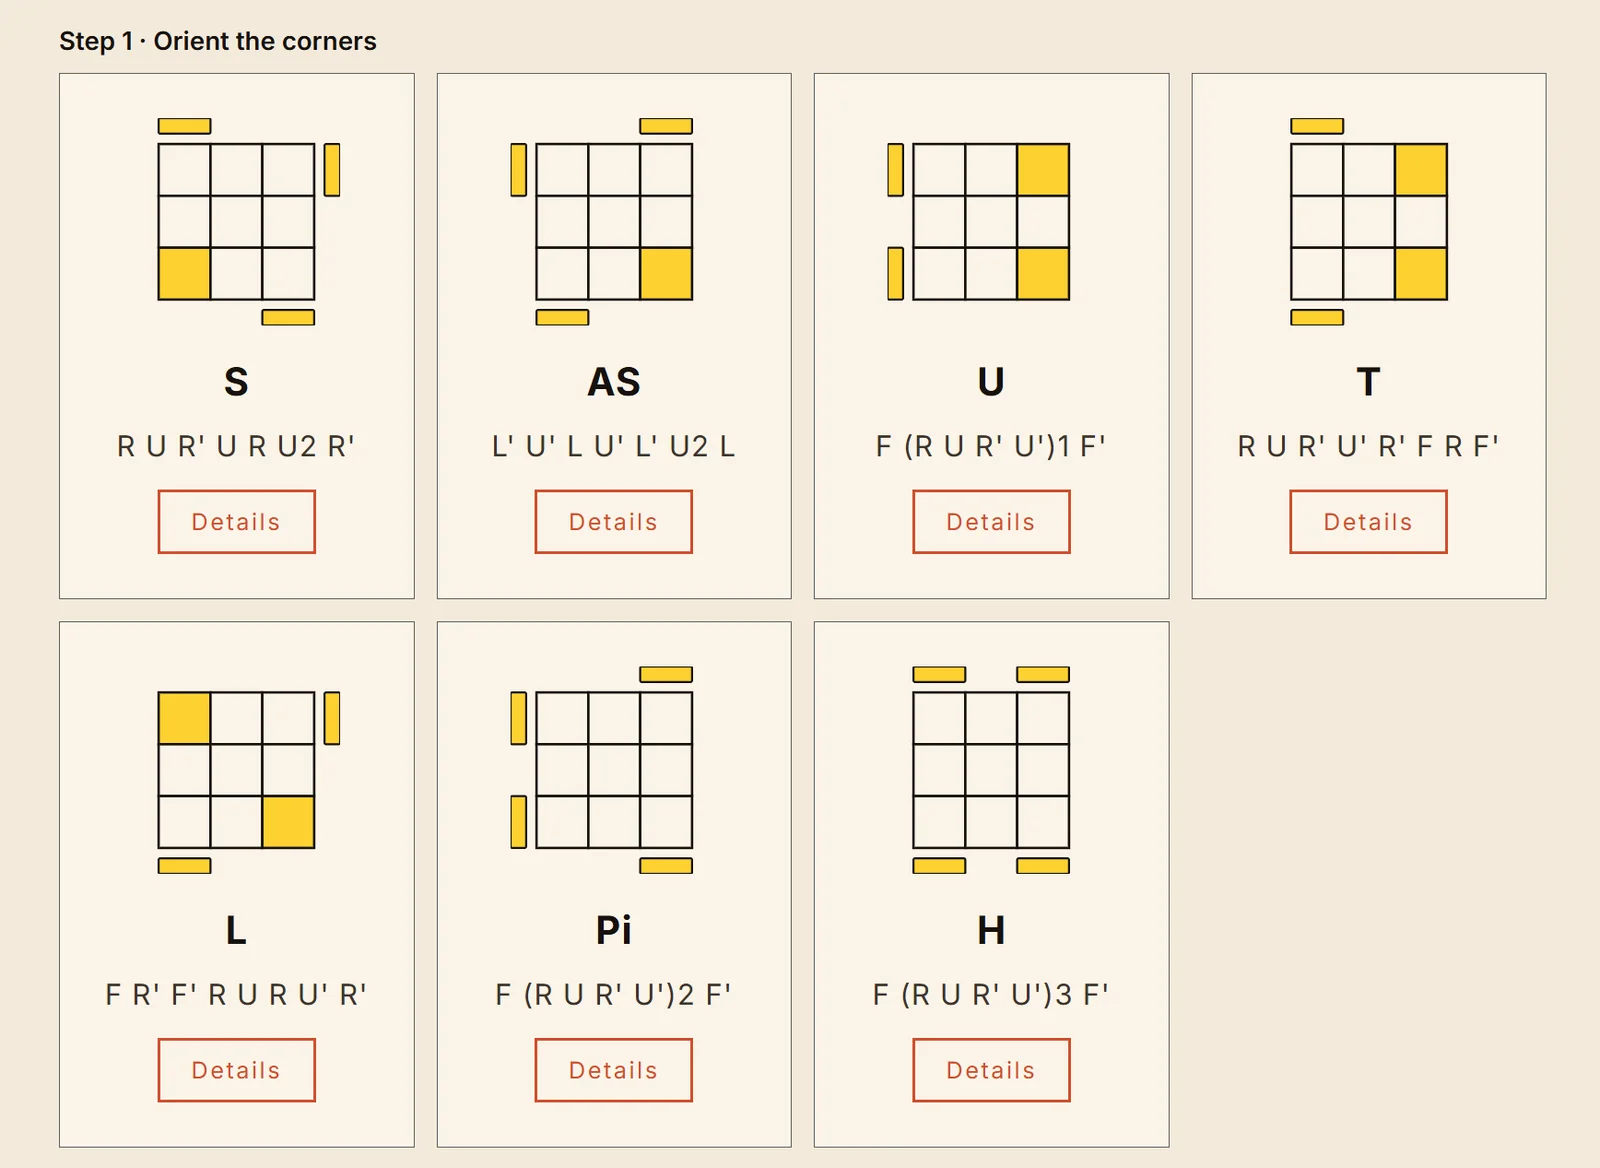
Figure: Two-step CMLL, first step: seven corner orientation cases. In the top-down view, yellow represents the top-facing color, while the small outer bars indicate when a corner’s top-facing color is oriented to the side. Identify patterns by the number of yellow corners: 0 for H or Pi, 1 for S or AS, 2 for U, T, or L.
Once the yellow tops are aligned, you can use these two algorithms to align the sides of the corner pieces.
If one face already has matching colors—for example, red is already aligned on one side—rotate it to the left, then you can choose the adjacent swap algorithm. If no face has matching colors, opt for the diagonal swap algorithm.
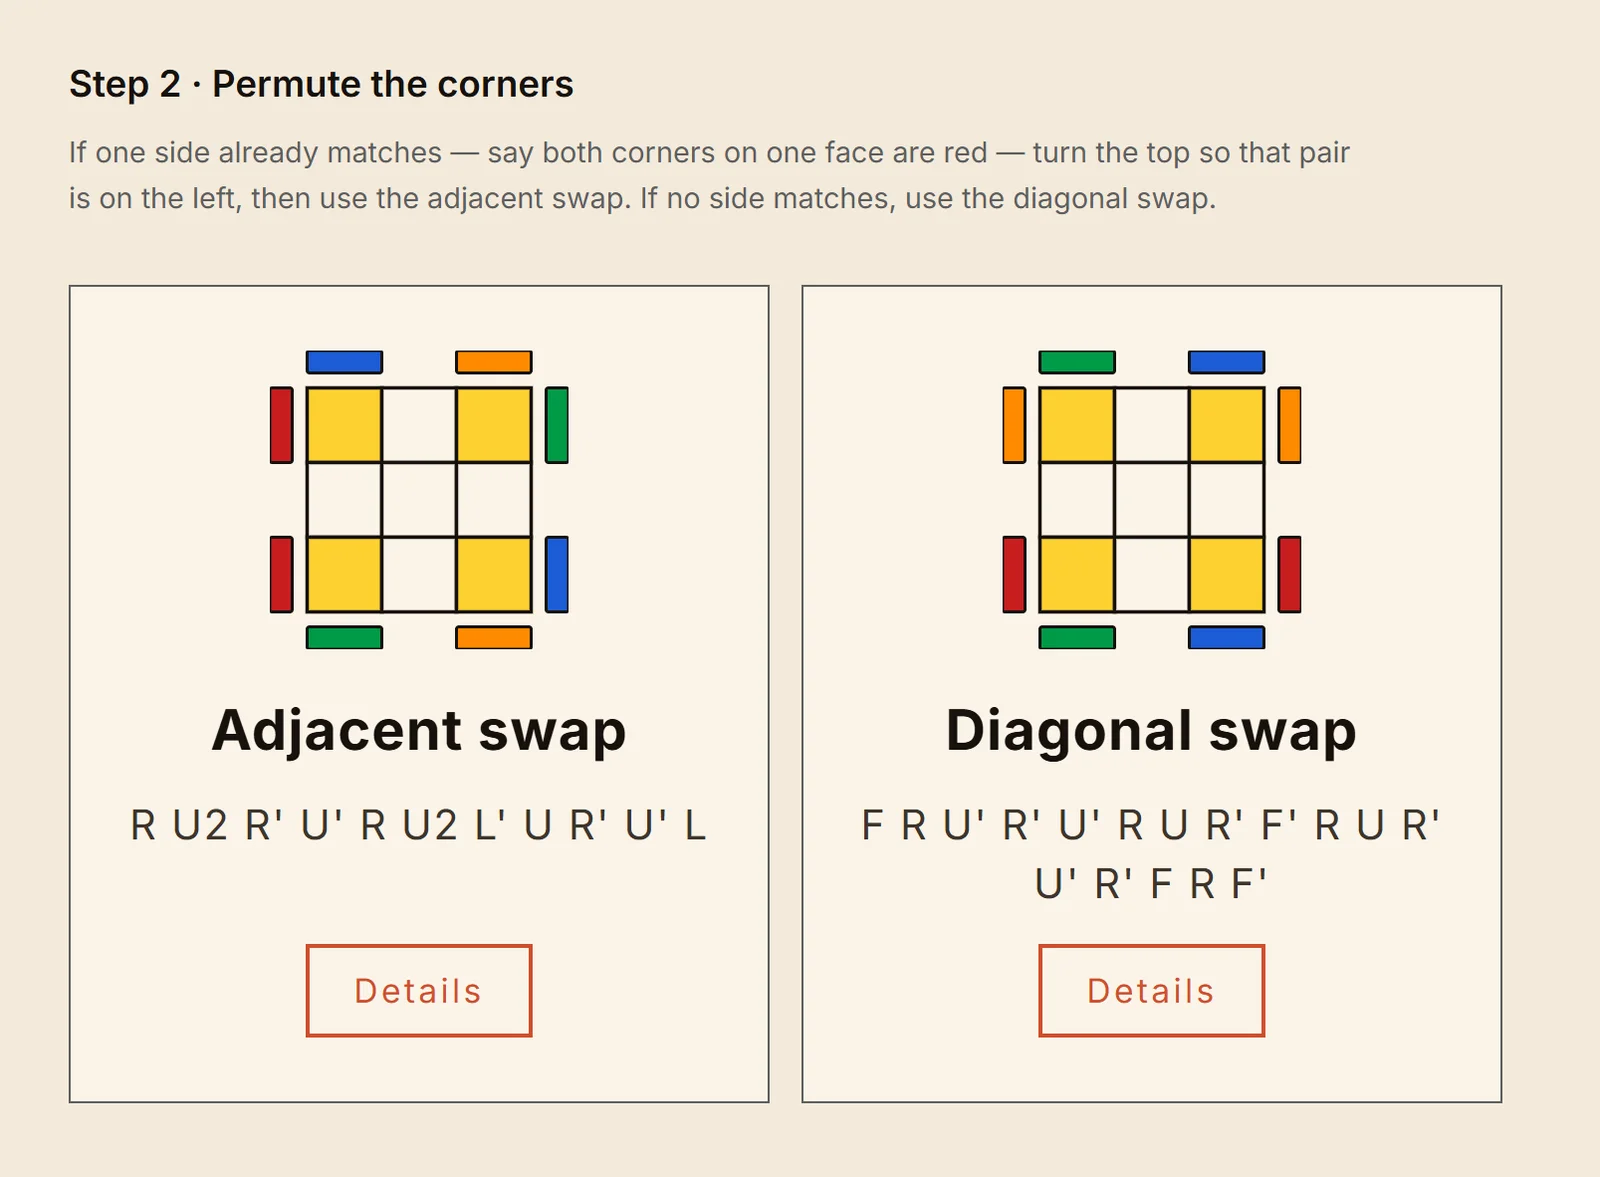
Figure: Two-step CMLL, second step: two corner permutation cases. In the left image, the red on the two left corners is already matched, so use the adjacent swap; in the right image, no faces are matched, so use the diagonal swap.
You can understand each set of algorithms through plenty of slow turning. Don’t think of them as formulas to memorize, but as a few fixed hand movements. You could eventually discover these movements through slow exploration, but listing them here saves you from unnecessary detours.
One more thing that will yield more immediate results than any practice: invest in a new cube. If you’re still using an old, clunky cube that clicks and catches, get yourself a modern magnetic 3x3. The latest cubes will make you appreciate the power of engineering optimization: smooth turning, auto-alignment, and almost no snags. Simply upgrading your cube can instantly shave off 15 seconds from your average time. A cost-effective choice is the MoYu RS3 M V5 (Maglev + Ball-Core), which costs around twenty dollars and will serve you well all the way to sub-20.
Stage Three: 40 Seconds → 30 Seconds (Weeks 5–13, Two Months)
Data: June 7th to August 4th. My Ao100 crawled from 39.8 seconds to 29.9 seconds, taking 58 days. During this stage you might occasionally dip below 30 seconds, but only on very lucky solves. And as your average solve time decreases, the difficulty of shaving off even one second increases exponentially. (Ao100 represents the average time of the most recent 100 solves, trimming the fastest and slowest 5%).
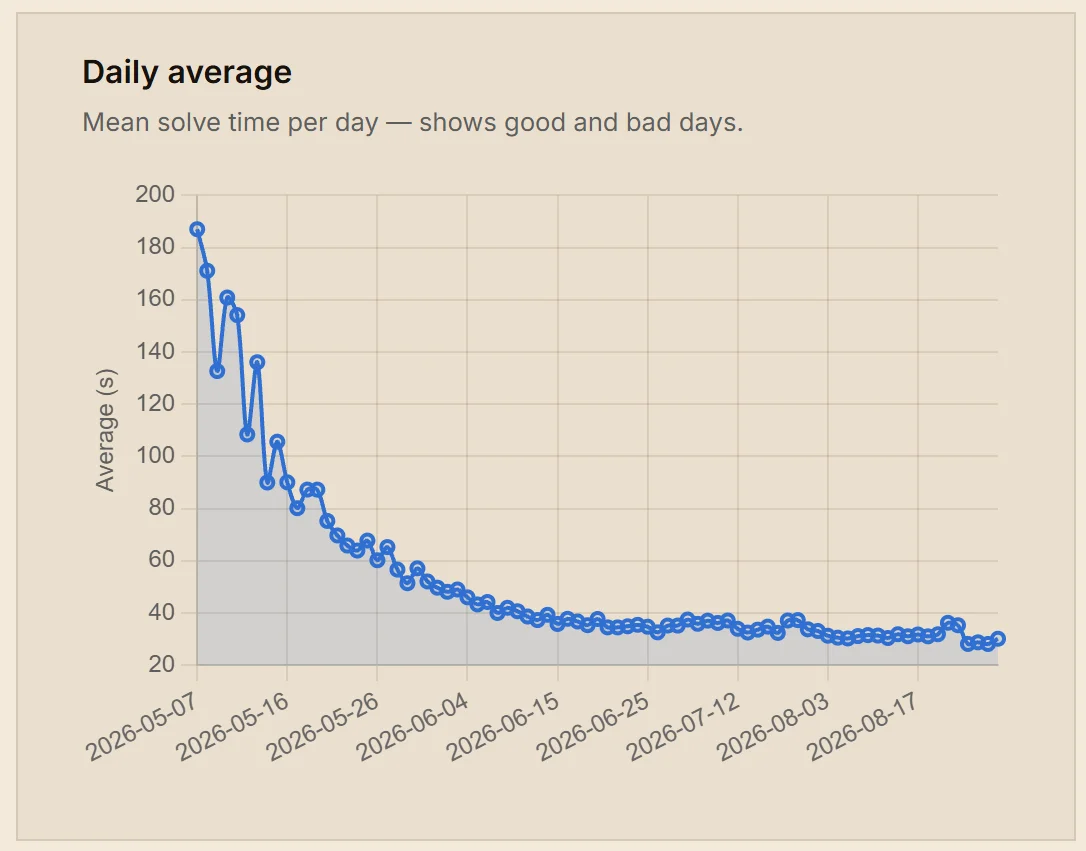
Figure: Daily average times. After mid-June, the curve flattened significantly, lingering between 30–40 seconds for two months.
Sticking Point: Solving the six top-layer edges was very slow; I didn’t understand the logic and relied on repeated trial and error, wasting a lot of time. Both the left and right blocks were still not fluent enough.
What to Practice:
-
EO recognition. As covered in the previous post, there are only a few cases for misoriented edges: 0; neither 0 nor 4; 4 with 2 on top and 2 on the bottom; 4 all on top; and 4 with 3 on top and 1 on the bottom. The goal at this stage is: the instant you finish building the blocks, you should be able to identify the case at a glance, without counting. The practice method is to scramble, solve only up to CMLL, then pause, state the number of bad edges, and then continue.
-
Many people don’t understand what the moves here are for. The whole point of the EO stage is to build the “arrow”: 3 misoriented edges on top and 1 on the bottom. Fully oriented edges are exactly one M’ U M away from the arrow, so, thinking backwards, the arrow is the last stop before the edges are done. Whatever the count of misoriented edges, the goal is always to build an arrow. With 4 on top, swap one top/bottom pair to send one misoriented edge down and you have the arrow. With 2 on top and 2 on the bottom, swap one top/bottom pair to bring one up, and you have the arrow. With 1 on top and 1 on the bottom, or 2 on top, do M’ U M first to turn it into one of the cases above, then build the arrow. With enough looking and thinking you can work out the best route for the 1/1 case yourself.
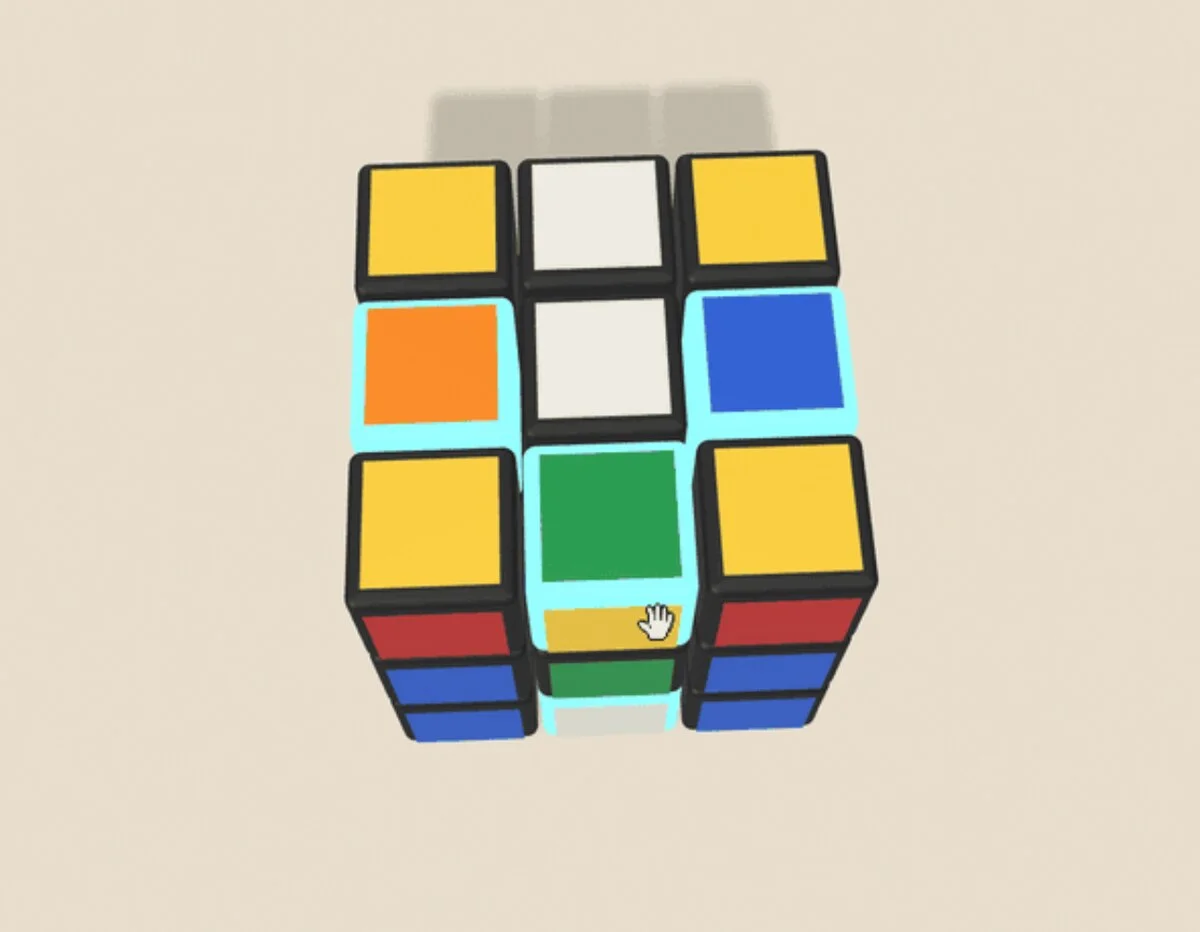
Figure: Arrow shape. Three misoriented edges on the top layer (highlighted in cyan) form an arrow pointing to the misoriented edge on the bottom layer. From here a single M’ U M fixes all four at once. Open this state in the 3D cube to see it step by step.
-
Extensive look-ahead practice. This is the most crucial thing for going from 40 to 30 seconds, and also the most counter-intuitive: turn a bit slower, look further ahead. When building the left block, don’t watch the piece you’re currently inserting; look for the next piece. It will feel very awkward at first, and your times will initially worsen, but stick with it for a week, and it will suddenly click.
-
CMLL without hesitation. If you have to think about a move every time before you dare to execute it, then it’s not truly yours yet. Practice each move individually 50 times until your hand moves instinctively upon seeing the pattern.
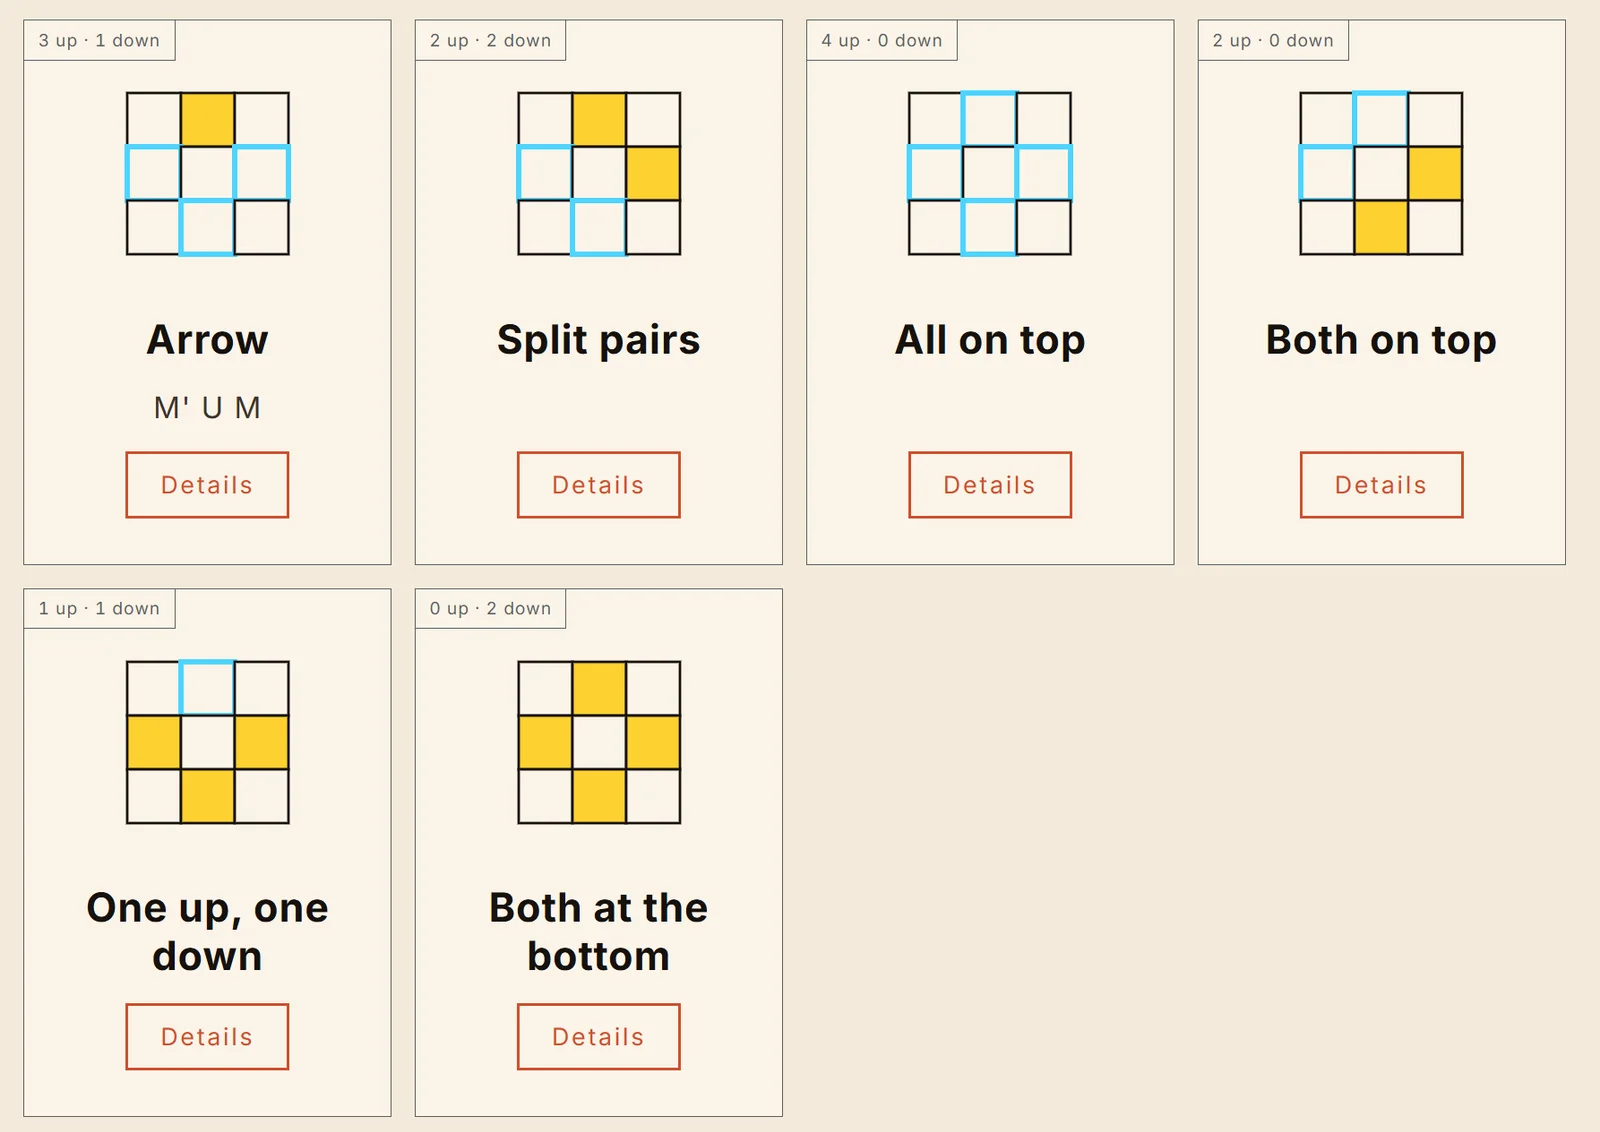
Figure: Six EO cases. The top-left label indicates the number of misoriented edges (top / bottom). Yellow indicates correctly oriented edges, while cyan boxes highlight misoriented edges. Only the arrow case requires an algorithm; the other five cases are first transformed into the arrow case.
For placing the UL and UR edges, take yellow on top, white on the bottom and a red left block as the example. The two edges still to place are the yellow-red and yellow-orange edges (highlighted). The idea is to swap the yellow-red edge down to the bottom layer, do the same with the yellow-orange edge, and get the two of them sitting opposite each other on the bottom. Then turn the top layer to line things up, and M2 U or M2 U’ places both edges in the U layer.
To help you understand better, I’ve compiled all six EO cases on the LSE page of the Roux Method Algorithm Library. Clicking ‘View Details’ for each image will open the corresponding state in the 3D cube, with misoriented edges automatically highlighted. The same page also covers UL/UR positioning and all cases for the last four edges.
A drop in practice volume at this stage isn’t a bad thing. Plateaus aren’t overcome by simply piling on more solves; they’re broken by fixing specific bad habits. My experience is to tackle one at a time.
Stage Four: 30 Seconds → 28 Seconds (After Week 13)
Data: After August 4th. In September, I recorded 122 solves, though many more informal practice sessions went unrecorded. I’ve integrated cubing into my daily life, treating it as a desk toy: I pick it up for a few solves when I’m in a good mood, when I’m feeling stressed or anxious, during work breaks, or when I’m just bored. My Ao100 has gradually dropped from 29.9 to 28.2.
Sticking Point: No clear bottlenecks, just insufficient fluency.
What to Practice:
If your average speed is still above 30 seconds, the only thing you need to do is continue practicing extensively, rather than memorizing new algorithms.
Continuously practice look-ahead through slow turning, and you’ll get faster and faster.
Keep your cube handy and play with it whenever you have a moment. Place it somewhere easily accessible, like your desk, so you can grab it during work breaks. Also, frequently record your solves and review them to identify which stages consume the most time, then optimize those specifically. This is deliberate practice: your progress isn’t determined by the total number of ordinary solves, but by the number of deliberate practice sessions.
You’ll then discover that once you push past the 30–35 second bottleneck, your speed will drop another notch.
Congratulations if you reach this stage—to beginners, you’re already a seriously impressive cuber!
Taking the Next Step
First, don’t worry about the upper limit of the Roux method. Top cubers use Roux to reach world-class ranks; the method itself has no upper ceiling.
Furthermore, almost every world-class one-handed cuber uses the Roux method because it’s genuinely well-suited for single-handed operation.
Fastest official (WCA) results with Roux:
- Single: 4.11 seconds, Sean Patrick Villanueva (Philippines), 2023 Valenzuela Cubing Open, recognized as the fastest official Roux single solve (Reconstruction Video)
- Average: 5.98 seconds, also by him, 2019, an Asian record at the time, and only the third official sub-6 average in history (WCA Profile)
- He is also the one-handed world record holder: average 8.09, single 6.05 (2024). The one-handed community widely considers Roux to be the optimal solving method.
However, to get under 15 seconds, you’ll need to transition from the current two-step CMLL to solving it in one step, which requires memorizing more complex algorithms.
Still, I prefer exploring freely: thoroughly understanding algorithms through exploration—or even coming up with algorithms that feel ergonomic to you—is far more fun than rote memorization.
The Rubik’s Cube was originally a puzzle, not a memory game. Only by understanding the principles can you truly know what you’re doing at every step, remember how to solve even after three months away from the cube, and figure out a solution for any unfamiliar cube you encounter.
Summary
Figure: Solved.
Getting from being able to solve the cube to under 30 seconds isn’t about memorizing algorithms; it’s about training your hands, eyes, and brain to work in coordinated harmony.
Four stages, four key takeaways: First, learn to observe without rotating the cube. Then, learn to build the right block without disturbing the left. Next, learn to look ahead to the next step while executing the current one. Finally, let your hands catch up to your eyes.
Algorithms aren’t the source of speed. Observation is.
Learn to build positive feedback loops through progress in each stage. Even practice focused on fluency doesn’t have to be monotonous, especially when you experience the thrill of breaking your record yet again. Particularly in the beginner and intermediate stages, you’ll feel the joy of setting new personal bests almost daily.
All algorithms and cases mentioned in this article are compiled in my Roux Method Algorithm Library. You can refer back to it whenever you get stuck.
The world of cubing offers endless enjoyment. Happy cubing!
Appendix 1: Practice Checklist for Each Stage
Stage One (> 60 seconds)
- Maintain a fixed observation position; do not rotate the cube during the entire solve.
- Find the next desired piece without pausing.
- Slow turning: verbally state your intention for each move.
- Practice only the left block, repeat 50 times.
Stage Two (60 → 40 seconds)
- For the right block, use only R, r, M, U moves, without disturbing the left block.
- Practice two-step CMLL.
- M’ U M’ U rhythm practice, 5 minutes daily.
Stage Three (40 → 30 seconds)
- After finishing CMLL, pause and instantly state the number of misoriented edges.
- Slow turning + Look-ahead: your eyes should always be on the next piece.
- At least 20 high-quality solves daily.
Stage Four (< 30 seconds)
- Record videos of your solves to identify pauses.
- Finger tricks: R U R’ U’ with index finger and thumb, M moves with the ring finger.
- 20 high-quality solves daily, focus on quality over quantity.
Appendix 2: Tools
- csTimer: cstimer.net. Enable Ao5 / Ao12 / Ao100 statistics; your Ao100 is your true skill level, while single best times are often luck.
- 3D Rubik’s Cube: philoli.com/zh/projects/rubiks-cube. All algorithms in this article can be entered here to view animations.
- Roux Method Beginner-Friendly Algorithm Library: philoli.com/zh/projects/rubiks-cube/roux.
- csTimer Training Analyzer: philoli.com/zh/projects/rubiks-cube/analyzer. Drag and drop your exported csTimer file here to visualize your performance trends, Ao5/Ao12/Ao100 curves, PB progression, milestone table, and Power Law practice curve.
This article contains Amazon affiliate links: if you make a purchase through these links, I may earn a small commission at no extra cost to you.